By Chris Coyier
When someone fills out your Wufoo form, we make it really easy to send a confirmation email to them to say,”Hey! Thanks for the data! We totally got it and we think you’re great.” This is a built-in Wufoo feature you can activate in our Form Builder under the Form Settings tab. In the Confirmation Options area, you’ll just need to check the Send Confirmation Email to User checkbox and then you can customize this message in lots of ways including who it comes from, what the reply-to email setting is, and the message it contains, which can include values from the entry itself using our templating features.
One thing Wufoo confirmation emails cannot do is send an email with a file attachment. We often tell users that if you wish to send people a file with their confirmation email, include a link to download the file in the customized message. Often times, that works great and is nearly the same experience. But sometimes you just want to send a real file attachment on an email. Like where the file is part of the email message itself. This is not a feature that Wufoo offers directly, but in this tutorial we’ll show you how you can accomplish this on your own by using Wufoo’s WebHooks.
The Big Idea
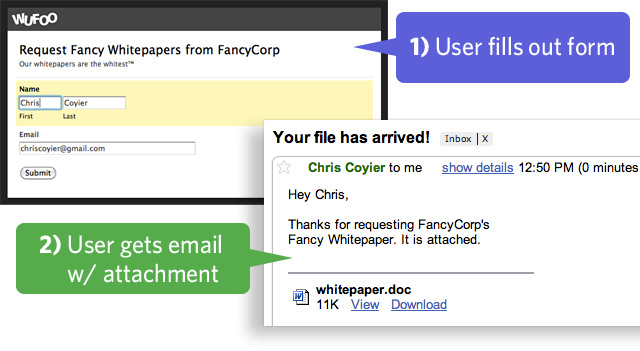
Sending whitepapers to people after they fill out a form is a pretty frequently asked question here at Wufoo, so let’s use that as an example. This is what we’re going to be doing.
- Create a form that contains at least one email address field.
- Create an email script on your website to send the emails with the files.
- Set up a WebHook notification on your Wufoo form to hit that email script.
- Test and Deploy.
Some of this sounds a bit tricky, but we’ll walk everyone through it each step of the way and even include the code you need to send out your emails with attachments. It’s going to be fun!
1. Creating a Form with Email Field
You all are probably old pros making Wufoo forms (else, see the Form Builder docs). The important part of this process though will be knowing the Field ID’s for each of the fields you create. To find that out, after creating your form head back to the Form Manager, click the Code button beneath the form then click the API information button.
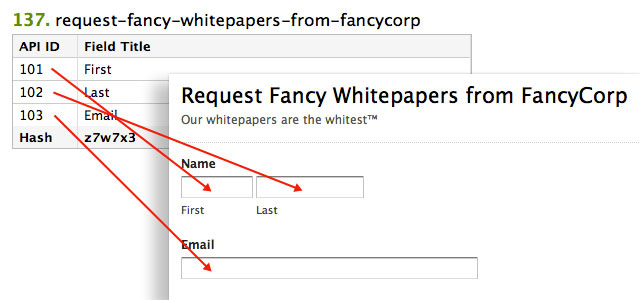
We’ll need these numbers for our email script…
2. Setting up the Email Script
For this part, we’ll be using the popular and ubiquitous PHP server-side language, but just about any server-side language could be used so long as it’s capable of sending email. The following example PHP script (based on this one) should be:
- Copied
- Placed onto a server you control (e.g. http://yourwebsite.com/sendemail.php)
- Customized
Toward the bottom of the script you’ll see a section of code that is meant to be customized. To use this for your own needs, you’ll be changing the file name, file path, “from” name and email, subject, and message. These are static values that remain hard-coded in the script.
A few parts of this script are dynamic values that will come from the values from the form entry itself. The most important of which is the email address of the person requesting the file. In the script, we pull this value by using the POST values the WebHook will be sending over:
$to_email = $_POST['Field103'];
Remember those Field ID’s we saw after creating the form? This is exactly why we need to know them. If the email field on your form is “103”, the POST value will be “Field103”.
Every single value from your form will be accessible to this script when we set up the WebHook. You could get as fancy as you want to be in customizing the final email sent. In our example script, as fancy as we get is adding the first name of the requester in the opening line of the email.
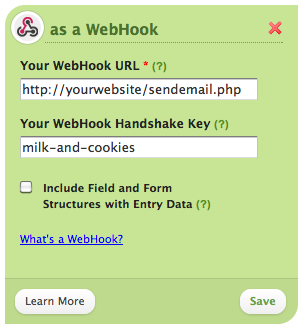
3. Setting up the WebHook Notification
Now that our form is ready and our script is in place, we’ll tell Wufoo to hit our script every time the form is successfully submitted. That’s the whole concept of a WebHook! We do this under the form’s Notification Settings (click ** Notifications** underneath the form from the Form Manager).
From the “Another Application” dropdown menu, select WebHook and click the “Add Integration” button. Then enter the URL of where you placed the script. In the “HandShake Key” input, enter a unique and secret value. This will add security to your script. Without this value being POSTed to the script, it will not run, so no other application can hit the script and send email, nor can the URL just be visited in a web browser. Make sure the test logic for the HandshakeKey in the script matches the value you enter here.
if ($_POST['HandshakeKey'] != 'milk-and-cookies') {
    echo "<h1>You are not who you say you are, mister man.</h1>";
    die();
}
With your WebHook notification saved and script altered to match your HandshakeKey, you’re all set to start testing things out.
4. Test!
As with anything you build, make sure to try it out a few times and make sure it’s working before deploying. Fill out your own form using your own email address and see if you get the email and file attachments. If you run into any trouble, try these troubleshooting steps:
-
Go back to the Notification Settings area in Wufoo and see if there are any errors. If there are, there will be a big red popup telling you what your server response was. You’ll need to make sure your server doesn’t return an error when Wufoo hit’s that URL. Common ones being 404 (you got the URL wrong) or 500 (possibly a permissions error).
-
Set up a Postbin URL and add an additional WebHook pointing to that. After submitting a form, the WebHook data should be viewable there, so you can ensure the correct data is being sent by Wufoo.
-
Give it a few minutes for the email to arrive. Wufoo WebHooks are pretty instantaneous, but your server and email service may not be quite that fast.
What else could you use this for?
Sending a file with a confirmation email could be used for cases where you want to offer a
- Simple File Request: Product interest survey which sends whitepapers on relevant products
- Rewards: Sign up for newsletter and get free eBook
- Next Steps: Make a camping reservation and get a PDF map of area
- Surprise: Contact form for a band automatically sends free MP3
Check out an example of this a file-sendin’ Wufoo form in action!