By Chris Coyier
Wufoo is perfect for creating RSVP invitation forms. Not only can you build the form fairly quickly and embed it onto your own website, but you can build reports that make the results from that RSVP very useful and understandable to your users.
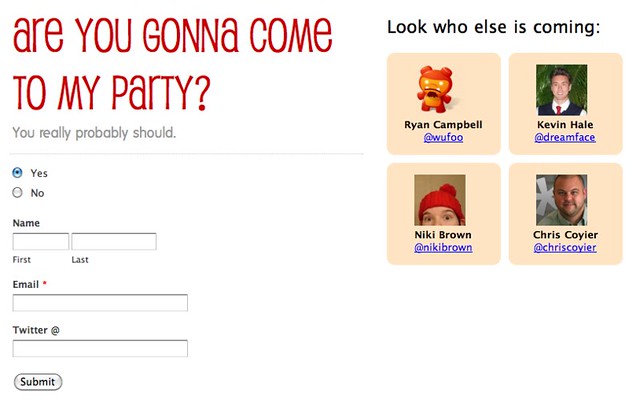
Today we’re going to roll up our shoulders and take a standard Wufoo RSVP form to the next level, by using the Wufoo API to create a public list of partygoers we can display right next to the form itself. This could a fun way to entice more people to RSVP yes to your party, once they see the list of awesome people already going! Here’s what the awesome will look like in the end:
Technology Requirements
We’re going to be working with a Wufoo form that is already created and then embedding it onto our own site. On that page on our own site, we will:
- Load the jQuery JavaScript library
- Load the jQuery Templating Plugin
- Load the Wufoo API jQuery Plugin
- Load a JavaScript function for creating MD5 hashes
Some of those scripts we’ll load from super-fast Content Delivery Services like Google and Microsoft, and some of it we’ll load locally. For your convenience, we’ve created this example package so you can just upload it to your own server, and play with it from there. Please note that our jQuery plugin uses a PHP file to fetch data from our API, so you need to be in an environment that processes PHP.
Getting the Partygoer Data with the API
With our jQuery plugin in place, making a call to the Wufoo API to get the data is really easy! This is all you gotta do:
$.wufooAPI.getEntries({
    "callback"   : processEntries,
    "formHash"   : "z7p0p1"
});
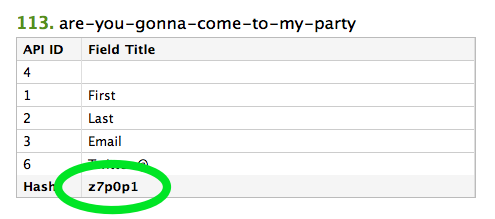
The formHash parameter is a unique API reference to your Wufoo form. You can get that in Wufoo by clicking the “Code” button beneath the form’s name in the Form Manager. From there, click the “API Information” button in the upper right hand corner. That screen looks like this:
The processEntries value is the name of a custom function we write ourselves to process the data the API returns. We’ll get to that in a just a minute.
The HTML
Before we get ahead of ourselves, let’s take a look at the HTML we’re working with on our web page.
<div id="page-wrap">

    <div id="form">
        <!-- Wufoo form embed code here -->
    </div>

    <div id="people">
        <h2>Look who else is coming:</h2>

        <ul>
        <!-- this gets filled with our partygoers -->
        </ul>
    </div>

</div>
That unordered list you see above is where we want to be inserting our little boxes of partygoer data. Each one of them will be a list item. Each list item will be created and inserted with JavaScript, from that processEntries JavaScript function from before.
Creating a Template
We know we want each partygoer to have its own list item, so let’s create that structure as a jQuery template like so:
<script id="attendeeTemplate" type="text/x-jquery-tmpl">
    <li>
        <img src="http://www.gravatar.com/avatar/${MD5(Field3)}" alt="Gravatar of ${Field1} ${Field2}">
        <h4>${Field1} ${Field2}</h4>
        <a href="http://twitter.com/${Field6}">@${Field6}</a>
    </li>
</script>
See the template placeholders, like ${Field1}? When we use this template, those will be replaced by real data. These are the exact names of the fields as they come across the Wufoo API. You can figure out which fields are what on the API Information screen (shown above). That table shows you the exact numbers of each field on your form.
Notice how easy it is to display a person’s Gravatar? All you do is MD5 hash their email address and you can grab their image at http://gravatar.com/avatar/that-MD5-value. Sweet Gravatar, you’re so good.
The CSS
With our template ready to create some HTML for us, we’ll need a little CSS to style up that list. We’re going for rounded blocks with centered text that line up in a grid. Here’s the CSS we used:
#people li {
    width: 115px;
    margin: 0 10px 10px 0;
    float: left;
    text-align: center;
    overflow: hidden;
    list-style: none;
    background: bisque;
    padding: 15px;
    -webkit-border-radius: 10px;
    -moz-border-radius: 10px;
    border-radius: 10px;
}
Using the Template
Now we’re finally ready to write that processEntries function which will utilize our template and drop in the HTML that we need!
function processEntries(data) {
    $.each(data.Entries, function(entriesIndex, entriesObject) {
        // Make sure this entry has all the required bits
        if (entriesObject.Field1 && entriesObject.Field2 && entriesObject.Field3 && entriesObject.Field6) {
            $("#attendeeTemplate").tmpl(entriesObject).appendTo("#people ul");
        }
    });
};
This function accepts data from the API call we just created. We then run a loop over all the entries contained in that data and for each entry, we call the template to pass in the entriesObject, which contains all the fields and their values. When that’s done, we’ll drop that HTML into the unordered list.
Notice that long if statement before we call the template, that’s just checking to make sure that there are values for each field we intend to use. So if someone RSVP’s without leaving an email, we’ll just leave them off our fancy list.
Credits
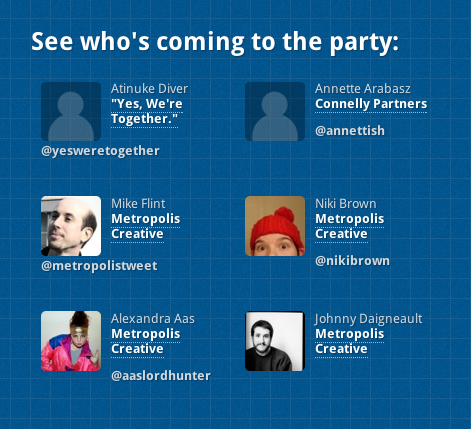
Special thanks to Niki Brown who came up with this idea and allowed us to write up a tutorial explaining how it’s done. She used it on her website here. Thanks Niki!
If you’ve used our API in a cool way or have a suggestion for an implementation we should figure out and show off, please let us know so we can share your hard work and sweet ideas!