By Robert Graham
This is a tutorial from guest blogger Robert Graham. He wrote a very cool bit of software on the Django framework for Python that is able to grade quizzes that are built from Wufoo forms. This tutorial is a bit more technical than what we usually serve up here, so if you’re a casual user, be prepared for hardcore code action.
Basic Features
This software (“wufoo_quizzes”) is able to extend the functionality of Wufoo by turning survey-like forms you build with Wufoo into quizzes that are graded. The user completing the quiz gets an email of their results or a certificate if they “pass” and the admin can get an email of the complete results of the quiz as a CSV file.
Dependencies
– Server running Python
– The Wufoo API Wrapper for Python : pyfoo
– python-dateutil – pip install python-dateutil
– django – pip install django
Step 1) Have a Wufoo Account & Create a Quiz
First, you’ll need a Wufoo account and a survey to use. The example I have tested this module with is about WWII history. Each quiz you use with this module will need a Name and Email field. Quiz questions are multiple choice fields, so they have one correct answer.
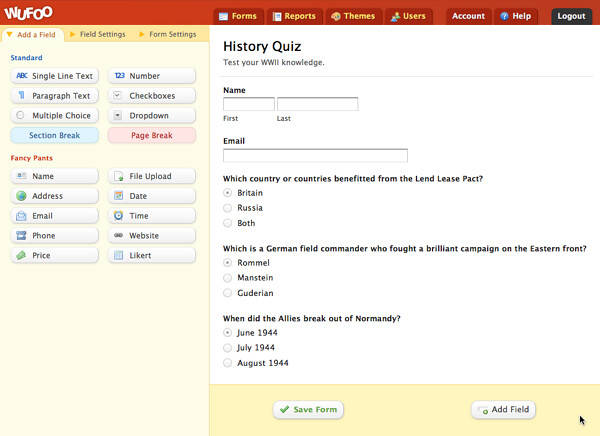
Go ahead. Make your Wufoo quiz. I’ll wait. If you just want to follow along with this tutorial exactly, we put this exact quiz into the Wufoo Template Gallery.
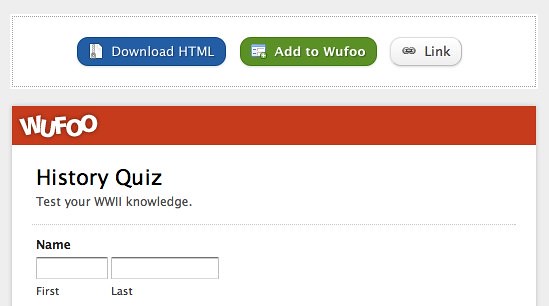
Just click the Add to Wufoo button and it will be added to your Wufoo account.
Step 2) Environment Setup
Now you need to prep a place to run the quiz grader from. Let’s make a virtualenv for that. Why, you ask? David Fischer makes it clear:
If you develop a Python module and you don’t test it with virtualenv, don’t make your next release until you do.
Virtualenv creates a Python environment that is segregated from your system wide Python installation. In this way, you can test your module without any external packages mucking up the result, add different versions of dependency packages and generally verify the exact set of requirements for your package.
If you don’t have virtualenv:
pip install virtualenv
Environment setup:
virtualenv --no-site-packages grader
source ./grader/bin/activate
pip install python-dateutils
pip install django
This prepares a Python environment that does not connect to your local root site-packages for dependencies and installs two of the three dependencies for this project into it. Now, download the code for wufoo_quizzes if you have not already. Unzip that in your choice location. Finally, we download our last dependency, pyfoo, which allows us to talk to the Wufoo API from Python. Unzip the .zip file you download from GitHub, then place pyfoo.py and the scripts folder into the same directory that contains quizgrader.py from wufoo_quizzes.
Step 3) Quiz Answers and Settings
Edit the answers.txt file in the wufoo_quizzes folder to contain the name of your quiz followed by new lines in a question: answer format.
Example:
WWII History Quiz
Which country or countries benefitted from the Lend Lease Pact?: Both
Which is a German field commander who fought a brilliant campaign on the Eastern front?: Manstein
When did the Allies break out of Normandy?: August 1944
You can place more quizzes in this answers file like so:
WWII History Quiz
Which country or countries benefitted from the Lend Lease Pact?: Both
Which is a German field commander who fought a brilliant campaign on the Eastern front?: Manstein
When did the Allies break out of Normandy?: August 1944

Other Quiz Name
Question 1: True
Question 2: False
Question 3: Honey Badger
Question 4: Vegas, Baby!
Make sure the question and answer text exactly matches what is on your Wufoo form. I copied and pasted mine directly from Wufoo after finishing the form.
You will also need to configure settings by creating a file named ‘locals.py’ in the same directory as quizgrader.py from wufoo_quizzes. You can copy and paste what you’ll need from quizgrader.py or the example setup below:
email_password = 'pw'
api_key = 'APIKEY'
wufoo_account = 'account' # this is the 'youraccount' part of youraccount.wufoo.com
smtp_host = 'smtp.gmail.com'
email_user = 'you@example.com'
templates = ('/your/path/to/this/project/', '/your/path/to/the/template/dir')
admin_email = 'admin@example.com'
admin_email_subject = 'Quiz Results'
success_message_text_alt = "This is an text only alternative message for those users pass the quiz"
required_score = 80.0 # 80% to pass
send_user_emails = False
send_admin_email = True
– Please note that the email_password is the password for your email_user on your smtp_host.
– api_key is the Wufoo API key from your Wufoo account’s API page.
– wufoo_account is the subdomain piece in ‘wufoo_account.wufoo.com’ which you can see when logged into Wufoo.
– The templates setting tells quizgrader.py where to find the template files that are included in the template directory. You can move those around if you like, but I had to give the directory of wufoo_quizzes and the templates directory to make sure Django could find the templates.
– admin_email is the email address that will receive the results from the grading in a CSV with the subject line of admin_email_subject.
– success_message_text_alt allows you to specify a text only message for user emails that pass the quiz. The default template for success is an HTML email which may not work in all email clients.
– required_score is the score threshold for pass/fail on your quizzes.
– send_user_emails and send_admin_email lets you specify if you want the system to send emails at all. All results are printed to stdout if not.
Step 4) Time to Take Over the World
Run the grader, receive emails, change your life! (Make sure you activate the virtualenv as above first.)
python path/to/quizgrader.py
You should see something akin to:
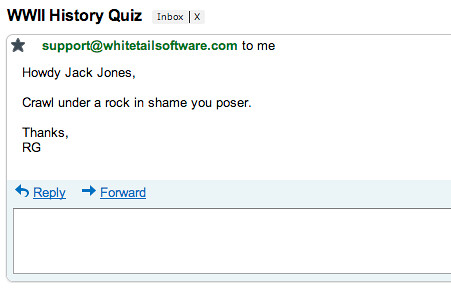
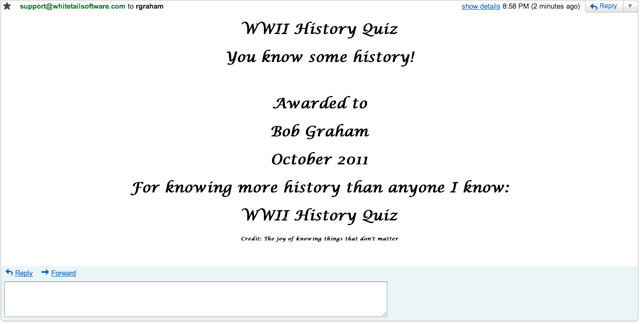
GreenEyedDevil:rgraham-wufoo-quizzes-tip rgraham$ python quizgrader.py
WWII History Quiz Scores:
guy@example.com scored 0.00 percent on WWII History Quiz.
rgraham@example.com scored 100.00 percent on WWII History Quiz.
Sending failure message to: guy@example.com
Sending certificate to: rgraham@example.com
Users who fail the quiz will get a text email from the template failure.txt like this:
Users who pass the quiz will get an HTML email from the template certificate.html like this:
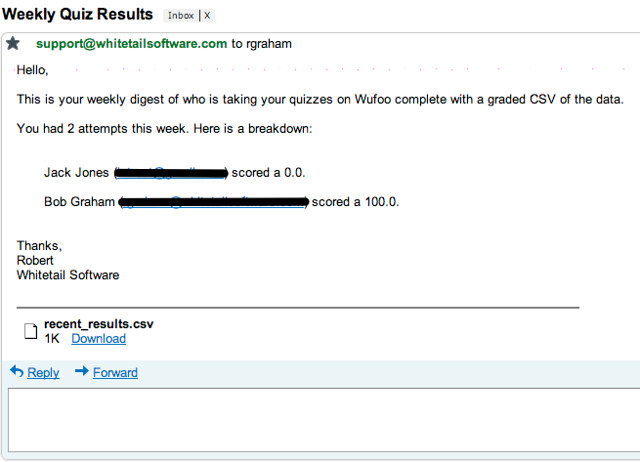
The admin will get a text email from the template weekly-email.txt like this:
The templates used to send emails are examples that you are welcome to use, but you may wish to include your own information in them. These templates use the Django template system and are easily modified to suit your purposes. Large changes, like what data is dynamically included in the templates will require you to modify the code, but any static changes can be made as easily as changing any text file.
Step 5) Extra Credit
Setup this script to run using cron. If you’d like to get results only from the last week, you can make some small changes to quizgrader.py to make that happen. Uncomment the if statement where you see (2 locations):
# FIXME make the date specifiable
#if datetime.datetime.strptime(entry[date_created.ID], "%Y-%m-%d %H:%M:%S") > (datetime.datetime.now() + relativedelta(weeks=-1)):
Changes weeks=-1 to whatever date range you have in mind. weeks=-2 for the last two weeks of results. days=-1 for the last 24 hours of results. You will probably connect this interval to your cron interval.
Disclaimer
This is a pretty light weight solution that is not suitable for extremely high traffic forms, but it might be just right for you or give you a starting point for building something more robust.
Questions?
You can also email me with requests or issues. I’ll do all I can to help. Thanks for following along and good luck quizzing!
Robert Graham is a developer, software entrepreneur, and consultant who maintains a blog about the experience. Robert has been working in software since 2005. He is a Ph.D. dropout who spent time working for Google. Someday he’d like to work for himself.